Tag Archives: Homemaking Monday

sweet up-cycled toddlers dress

Standard
sweet up-cycled toddlers dress

I am still on my up-cycle kick!

I saw a picture of a men’s dress shirt made into a toddlers dress on pintrest, but…..there was no tutorial – of course! (By the way – I really do love pintrest!) There are really so many ways to create a darling dress from a mens button down. There were some super cute dresses made in a classic pillowcase design with tied straps or ribbons that had great tutorials and still others that simply took the fabric and made a dress from the shirt. Super cute too! But, I preferred a classic design so I made my version complete with this tutorial for you because I am all about not recreating the wheel! Enjoy!

Here is what you need:

1.) A mens dress shirt (mine was found at a local thrift store scored on half-off sale day!) 2.) some matching thread – or not if you prefer 3). a peice of paper for the sleeve pattern 4.) basic sewing materials 5) a simple dress that fits your little miss 6.) elastic – I had 1/2 and 1/4 inch widths laying around so that is what I used. See those steps for measurements of elastic.

First off lay your shirt out flat, and cut up the side seams, remove the pocket if your shirt has one. Hint: you might want to save the pocket.

start with a mens shirt

start with a mens shirt

cut up the sides of the shirt - don't forget to remove the pocket too!

cut up the sides of the shirt – don’t forget to remove the pocket too!

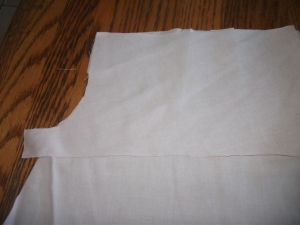
Put the dress that is serving as your guide over the top of the button down, make sure you line up the buttons down the center of the dress then cut long the dress outline. Just cut a rough outline, don’t get hung up on perfection.

here you have the basic dress shape cut out.

here you have the basic dress shape cut out.

I wanted the dress to have sleeves so I made a pattern (my dress is a size 4-ish)  from the piece of paper. I used a pattern I already had for the sleeve instructions, because I love love love the sleeve design and the design fits this style of dress. The pattern I used for the sleeves is called the ‘Clair’ by Portabello Pixie.The sides (tab looking sides) of the pattern were a little long and exaggerated, but no big deal just trim it up to match up. This is a VERY forgiving pattern.

sleeves

Cut off the sleeves of the shirt and along the underarm seam. Lay out the opened up sleeve fabric and cut out the sleeves for the dress (you’ll need to cut 2)

The top of the pattern is the width of the top of the dress minus 2 inches. That makes mine 10 inches long across the top. Make the sleeves as long as you want them to be, keep in mind seam allowances and elastic casings. On my pattern example, the underarm tab part is 3 inches. The total height of my particular sleeve is 7 inches. The bottom width is the top width plus 7 inches, making mine 17inches wide across the bottom.


Lay out one of sleeve on top of the dress front, and sew it on. Then attach the other side of the sleeve to the back. Repeat with the other sleeve. Notice my underarm (tab looking part) of my sleeve pattern was to long? Just cut it off. No biggie!

place the sleeve over the dress, right sides together and stitch.  together.

place the sleeve over the dress, right sides together and stitch.

now your sleeves should look like this attached to the dress.

now your sleeves should look like this attached to the dress. This sleeve is attached to the front piece on one side and the back piece on the other.  Right sides together, you are viewing the back side of the fabric on all pieces.
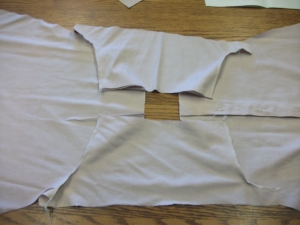
both sleeves are now attached. (in the pic they are fold over and laid flat so you can see how it should look.

both sleeves are now attached. (in the pic they are folded over and laid flat so you can see how it should look.

Now you should have something that looks like this when laid out face down. Match up the sides and pin them. Do this for the under arm part of the sleeve as well.

Lay the dress, right sides together still flat and line up the sides.

Lay the dress, right sides together flat and line up the sides.

Stitch up the sides of the dress, including the underarms.  Can you believe we are almost done!

Stitch them together.

Stitch them together.

Now the beauty of this dress is the bottom hem is already finished. That works for me because it is a huge time saver! Your dress should be looking like the picture above at this point.

Now we are going to work on the neck line, you going to need that elastic. Mine is 18 inches long, but mine is made for a size 4. You may need to adjust to fit your dress size.

Here are a few suggestions for elastic measurements:

Neckline: 12-24mth 16″; 2T 16.5″; 3T 17″; 4T/5T 18″

Sleeves: 12 mth through 2T 7.5″; 3T/4T 8″; 5T 8.75″ Be sure to double check as everyone has different arm widths and you don’t want your child to be be uncomfortable. It should give shape to the sleeve only not be tight.

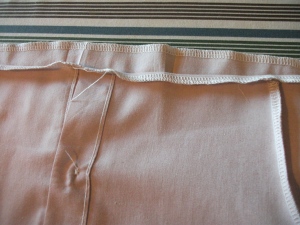
lay flat and iron your elastic casing for the neck line.

lay flat and iron your elastic casing for the neck line.

Press an elastic casing by folding over the edge of the neck line and then fold it over again to create the casing.

(You will notice all my edges are serged. I love my serger and use it as often as I can but you do not need one – just follow the directions with a regular straight machine stitch.)

Do the same for the sleeves. REMEMBER to leave a place to thread your elastic through the casing. Pin the elastic to a safety pin and feed it through. Once the elastic has been fed through the casings secure them together. I used the 1/2 size for the neck then sewed the elastic ends together because I wanted it to lay flat on the neck to reduce bulk; but for the sleeves I used 1/4 size and just tied them because it wouldn’t be too bulky or uncomfortable at the location of the dress. This is completely preference as to how you secure the elastic and what size you use for that matter – just make sure your casing is large enough for whatever size you choose to use.

to create the casing fold over the raw fabric edge, and fold again.

to create the casing fold over the raw fabric edge, and fold again.

all ready to be sewn - don't forget to leave a place to thread the elastic through.

all ready to be sewn – don’t forget to leave a place to thread the elastic through.

the neck is finished. YEA! now do the same for the arms.

the neck is finished. YEA! now do the same for the arms.

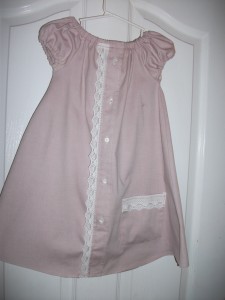
Wal-La! You have a darling dress for your sweet girl.

all done! well almost.....

But now the question……do you embellish it or leave it plain? I decided to embellish mine    because the color was a solid peachy tone and I think it need a little something more. Dare I say cute but a bit boring ???

Also, there was a ink stamp stain on the lower left side of the shirt. So, In comes the pocket to save the day! I placed it a little lower than normal to cover the stain, added some lace remnants and now it is finished!!

DSCF3153

Making Garlic braids – early summer harvest

Standard
Making Garlic  braids – early summer harvest

The other day I harvested my garlic. This was the first year I have planted garlic and it was really an act of faith. You basically stick this little clove in the ground and 7 or so months later you dig it up and see what you get. There is excitement when the greens grow up from the ground and I am sure more experienced garlic growers can tell what’s happening below the soil, but for me it was a mystery. I planted in October and had no idea what to expect until I harvested the first of June. I thrilled to find big beautiful blubs awaiting me!

So now I have all this garlic – how on earth am I going to store my bounty for the coming months? I have a wonderful farmer friend, who gave me that garlic to plant and was able to offer her advice. I could cut off the greens and the roots then store them away for future use. Which sounded great, until she posted pictures on facebook of her garlic braids. So began the search for how to do that. You know that saying “Everything I needed to know I learning in Kindergarten” my saying is ‘”Everything I needed to know I learned on you tube!” I spent some time on the You Tube academy and here are the results!

The Garlic Harvest. I let these beauties dry for a few days. By the way, you have to dig your garlic, don’t just pull it out. You’ll want to harvest when there is 60% of the green left & stop watering a couple of weeks before you plan to dig.

garlic

After that, I brought them inside (caution- this is messy- so I recommend you create your braids outside). You have to clean them up a little first, knock off any loose dirt that has dried on, My oldest son helped with this process, just gently rub the blubs its okay if a little skin comes off and cut the roots off.

That was the longest part of  the whole process. Now for the fun part! Take 3 heads about the same size and tie them together with some twine. If you can braid hair you can do this, just make sure your braid stays tight. Start braiding the leaves of the garlic, as you turn one over into the braid add another garlic bulb.

Keep going, folding over the stems into the braid, add as you go. Keep it tight, I found that that was the hardest part. When you reach the length of the braid you want stop adding garlic and keep braiding the stems until you start to run thin on stems.

Once your at this point, you need that second piece of sting to tie off your braid. Make it tight as this is also you hanger. A third hand helps to hand the knot tight, make a double knot – maybe even a triple. Turn the braid over and tie it again in the back. Make a loop with the twine to hang your beautiful braid. Clean it up by cutting off any loose or stray leaves and the ragged top leaves.

And Wa-La you now have a beautiful garlic braid to use year round.

hang ing the braids

Besides having wonderful home grown garlic at your finger tips. these would make great gifts too.

Garlic is so good for you. Here are just a few of the health benefits; (found on http://naturalhealthremedies.org/what-are-the-health-benefits-of-garlic/)

It’s also one of the healthiest foods you can eat. For centuries, garlic has been considered a “cure-all” and is said to be able to treat just about every ailment from the cold to the Plague! I don’t think there are too many Plagues about these days so here are a few other ways you can use garlic to improve your health:-

Acne – Most people at some point in their lives suffer from acne to some degree. Companies make a fortune selling facial washes and creams to help. The problem is that there are many reasons for acne including hormones, diet and stress. Although garlic on its own is unlikely to cure acne, it can certainly be used in conjunction with other treatments.

Garlic is thought to work because of its antibiotic and blood cleansing properties. When using garlic in your food, make sure your crush and chop it up. This will help release the active compounds. Another way to take garlic is by placing a few cloves in a bottle of olive oil and then drizzle it over a salad.

Cardiovascular Health and High Cholesterol – If you enjoy eating Mediterranean or Far Eastern food you’ll notice that garlic is used a lot. The good news is that people from areas also have low incidences of cardiovascular disease.

Cholesterol can be a confusing area of health. On one hand it is essential whilst on the other hand it can kill us. This is because there are two types of Cholesterol – HDL and LDL. The latter type is considered bad. Modern medicine has found that garlic contains allicin which scavenges hydroxyl radicals (OH). This is turn is thought to prevent LDLs from being oxidised.

Antioxidant – Allicin naturally increases antioxidant enzymes atalase and glutathione peroxidase in your blood. It can help against the damaging effects of nicotine and slows the aging process of your liver by inhibiting lipid peroxidation.

Anti-Bacterial – Garlic has 1% of the potency of penicillin and can ward off a number of bacteria such as Listeria, Salmonella, E. coli, Cryptococcal meningitis, Candida albican and Staphylococcus. The problem with most antibiotics is that bacteria develops resistance to them, however this is not the case with garlic.

These benefits were first realized back in the early 19th century when English priests caught infectious fever. The French priests, who ate garlic everyday, didn’t.

Blood Clots – Clinical trials, which were published in the Journal of Hypertension, showed that the blood pressure of volunteers was reduced 1 – 5% after taking garlic supplements. This may not sound a lot but this small reduction can reduce the chance of a stroke by 30-40% and heart disease by 20-25%

What about Garlic Breath?

Despite all the health benefits of garlic you may feel that “garlic breath” is too much of a deterrent. If this is the case you can take Odorless Garlic Supplement instead.

Some Pointers about Garlic:-

  • Garlic is most effective when crushed or chopped and when raw.
  • One clove a day will improve your health and 2-3 cloves will help prevent a cold.
  • When cooking garlic wait until the last 10 minutes of cooking to add the garlic.
  • Be careful about taking too much as it can irritate your digestive system.
  • Don’t microwave garlic as this kills the active ingredients.
  • Don’t take garlic instead of a healthy balanced diet.
  • Garlic supplements may interact with certain drugs such as anticoagulants.
  • Always consult a doctor if you are unsure about anything.


Bad Attitudes?

Standard
I am reposting from a blog today that I follow from Above Rubies. It is such an important and timely topic (for me) living in a house with a handful of pre-teen/teens. I do hope your blessed and encourage you to visit Nancy Campbell’s site Above Rubies. Her ministry is all about equipping women in their ‘high calling’ as mothers. bad attitude teen
“DON’T ALLOW  BAD ATTITUDES I have been posting about training our children to have obedient ears. Another important area of child training is training our children out of bad attitudes. It is the fleshly nature to respond with a negative attitude when things are not going just the way we like them. However, if we let our children get away with pouting, putting on a glum look, “packing a sad,” maintaining a bad attitude and mood, we set them up for problems in adulthood, and especially in their future marriage. The basis of these attitudes is selfishness and it is selfish attitudes that cause many marriages to fail. I think of Ahab in 1 Kings 21 who  got into a mood because he couldn’t get his own way. Because Naboth would not sell his vineyard to him, he went into his house “vexed and sullen,” lay down on his bed, turned his face to the wall and wouldn’t eat! What a wimp! He obviously was not trained by his parents and so was still acting like a… three year old in adulthood. Deal with bad attitudes in your children immediately. Nip them in the bud! Don’t allow them in your home. Of course, you will be showing a good example in your own life. They won’t see you putting on “the silent treatment” of getting into a bad attitude where you can cut the atmosphere with a knife! When raising our children, we never allowed a bad attitude or response. We dealt with it immediately and severely. Today, our children don’t know how to get into a bad attitude because they were trained to have a good attitude. This blesses their marriage and therefore they all have the “best of marriages.” Love from Nancy “

A virtual farm tour – Welcome to Golden Acres Farm!

Standard
A virtual farm tour – Welcome to Golden Acres Farm!

I want to welcome you to our little farm! Spring is here and there is a lot going on. The other morning I woke up and checked on our meat chicks and it seemed overnight they our grew their night-time home – for the 3rd time! SO I decided I was going to build them another home that could also double as a chicken tractor! With my husband away for work I had to call out the kids for some hands on education! Put the books away and let’s build something! This is the final product – Yes I am proud of myself – the kids too!

Basically, it just a frame made from recycled wood, chicken wire and a little door on top so its easier to get them out and replenish their water & food. At night they live in the garage for safety until they are bigger and the weather stays warmer at night. I just put a tarp down with clean shavings put the chicken tractor on top. Fast & Easy clean up – just pick up the tarp and dump the soiled shavings in the compost pile. During the day I can set the chickens out on a nice patch of grassy pasture and they happily peck away at their natural salad bar all day. Everyday they get a new spot, they are happy and I am happy knowing what I am eating is naturally home-grown.

There are 4 ducklings in there, talk about cute – did you see the guy with the fuzzy up-do? And two of my daughters (7yrs) show chickens. (She took the pictures for me today)

Next stop is our laying hens. These are actually my oldest daughter’s (11yrs) hens. They are free range raised, unless it is planting time in my garden, because they can’t help them selves from digging up my seedlings. So for the next few weeks they are let out daily when she can baby sit them in the late afternoons. I feel for the girls though, every day at the same time they all pile up by the yard door ready to make a run for it as soon as that door is opened up.  She sells the eggs and has a nice little business going. Chickens are so interesting to watch – if you ever have the time stop by a local farm and sit for a while – you’ll have a blast watching them! I promise.

Then there are our goats. Snow ball and Snow flake. They are brother and sister and were born right here on our back pasture almost a year ago in June, so why the names about snow I’ll never know – that was my hubby’s idea. We down sized our heard and kept these two. We miss the raw milk but need a break from milking.  I think we are really to get in milk again. They are great lawn mowers (no fruit tree is safe). On myth I would like to disspell – goats do not eat everything. At least mine don’t they are picky eaters actually. They love my husband and my younger son (11yrs) is our resident goat herder when they escape – while they are picky eaters they are also Houdini’s!

The pigs are my favorite.  They are so smart, they bark like dogs (no I am not kidding) and they love to play. My oldest son (13yrs) is our pig farmer. He raises some to sell for meat, has bred and sold piglets, and raises them to take to show at the county fair. These two are named Romeo and Juliette. They are raised on a pasture so they get to eat the grass, root in the ground and soak up the sun. At the end of the month he will be bringing a couple more pigs to his herd. Turn a litter of piglets loose in a garden and you have root-a-tillers!

Next week we will be getting 3 baby lambs. Two are my daughters and one is my younger sons. Two will be shown and sold at the county fair and the other my daughter is raising to sell for meat. These are two of the lambs just hours after they were born at the breeders. AWWWW! Oh – and then there is one of the spoiled cats. This one is boots, my husband brought her home for my daughter 2 years ago for her birthday. Yes she is the princess – just in case you were wondering.

Well thanks for stopping by! Whats going on in your corner of the world?


When they fall like flies – some home remedy for colds and flus

Standard

There are few days in my life when I dread being a mom than the days when the kids fall like flies with a sickness. We do not get sick very often but when we do there are a few simple truths I have come to accept over the years…

cold1, I know it is likely to hit all of them

2, I hate to clean up throw-up

3, it makes everyone extra grouchy

4, with a family of my size it will take a good month before it is gone

last but not least 5, I know its coming for ME and it will likely get me when all the kids are feeling better! OF COURSE!

So how do we deal with sicknesses in our house? Well we don’t go to the Dr. unless I really feel it is really necessary. They are very costly and often times treat the symptom not the source. Plus it tends to hurt more when you are told with-in 5 mins, thanks for coming in – it has to run its course, now pay $85 on your way out & be sure to take some Tylenol.

Now that you know what we don’t do, here is what we do – do;

Vitamin C is my best friend!! Take tons of the stuff! My mid-wife sold me one this years ago when I had a breast infection, she told me; “take it until you get the runs” (sorry for the bluntness) and guess what it worked! NO anti-botics! Now you can call me a believer.

Oregano oil, you can take it internally (be sure to get the pure oil for medicinal grade) and combine it with a carrier oil and rub on your chest, back and bottom of your feet. It tastes nasty so chase it down with stong OJ and if not properly diluted with a carrier oil it burns.

Grapefruit seed extract

Mullein Leaf extract

Hot tea and raw honey

home-made chicken soup – Grandmother knew a thing or two!  All the research agrees that chicken soup helps break up congestion and eases  the flow of nasal secretions. Many say it also inhibits white blood cells that  trigger the inflammatory response, causing sore throats and the production of  phlegm. Chicken also contains an amino acid called cysteine that is released  when you make the soup. This amino acid thins mucus in the lungs, aiding in the  healing process.

When combined with nutrient rich veggies, homemade chicken soup can  definitely help the healing process in those who fall prey to colds or the flu!  http://www.naturalnews.com/021260.html#ixzz2Nxp2bdh4

Mullen Leaf steam for stuffy noses, Make a pot of boiling water add the leaves, stir. Lean your head over the pot and breath in the steam, be careful not to burn yourself! You can also drape a towel over your head and create a steam bath for you sinuses!

For coughing here is a great recipe: http://nancyvienneau.com/blog/articles/home-remedy/ or this one http://wellnessmama.com/7969/herbal-cough-syrup/

If you have a diffuser, diffuse oregano oil with peppermint and eucalyptus globulus and  breath it through out the day.

Plenty of rest and sleep!

Do you have any herbal remedies you use for your family? How do you fight off the nasty cold and flu bugs?

I would love to hear what works for your family!

The home management binder

Standard
The home management binder

Let’s face it, papers tend to pile and the piles topple and then get shoved somewhere until we can deal with them, right?

I wanted to share with you today one thing I do that has streamlined my life, well streamlined it as far as knowing where important papers, contacts, lists and such are.

Here are my rules:

#1 Sort the mail over the trash. You know most of it is junk anyway!

#2 Mail that needs to be kept goes into the mail basket in my office. All other papers that accumulate throughout the week go into another basket. I will go through these baskets during my office day.

#3 When I deal with the baskets I must empty them, taking care of all the mail, papers, notes, ideas, lists, receipts, etc.

One place many of these papers end up is in my home management binder. That is what I want to share with you today. Some stuff goes into my file folder system but, today I will just cover the binder.

The binder is basically a big three-inch 3 ring notebook.

First I brainstormed all the areas of my life that need to be at my fingertip for easy finding.

  1. family calender
  2. daily schedule and commitments
  3. meal planning
  4. pantry / freezer inventory / shopping contacts
  5. cleaning and chore lists
  6. holiday ideas
  7. items loaned and borrowed
  8. contacts, personal, web, business
  9. home school lesson plans
  10. student records
  11. school ideas, websites, curriculum providers
  12. co-op info
  13. finances / tax info
  14. farm chores & contacts/suppliers
  15. garden planting notes
  16. list of who’s birthday or event is when
  17. vehicle info, service, purchases
  18. medical
  19. hospitality
  20. church / ministry
  21. speaking topics and contacts
  22. blogging ideas and such
  23. Blessings business info
  24. emergency info
  25. misc stuff (everyone needs to have this category!)

A Home Management Binder is a personal thing that will look different from family to family. That was a list of what is in mine. Keep in mind I like to have things really broken down and have a lot going on in my life so I have lots of tabs. I could have grouped things in more general categories but that isn’t what works best for me.

How do you know what should be in your Home Management Binder?
A good place to start is by rounding up all the papers that collect in your home.  Where do you stick papers that you know you will need again in the future? Where do your to-do list and shopping lists end up?  Gather all those things together and sort them into piles by similar subject matter.  Now you can create a section in your binder for each pile. You can do this as general or as specific as you like, do what works for you and your family; otherwise this won’t work for you if you just try to mimic someone elses binder. This binder will be a unique as your are!

Here is a list of things to gather once you have broken down your papers into how many categories you will need:

  • A binder (think about the size you’ll need)
  • divider tabs – this should match the number of categories you have created
  • 3 hole punch
  • a plastic pouch to hole stamps and such

Here is where the fun begins – just think no more piles – what bliss!

Label your tabs with a key sheet, this would be the first page in your binder. I used numbered dividers so this step was really important for me. If my husband needed to find when the last time the oil in the van was changed, how would he know to look under tab 19 it if was not labeled? You could also label the tab itself if it has the room and in that case you may not need a tab key, again, you need to find what works best for you and your family.

My first tab is ‘Contacts’ . I just use a printable contact sheet from mead.com. I also stuck a few sheets of business card holders behind the paper contact sheets. These contacts are not ones that would be included under another tab such as, farming or medical, in my case.

From there fill in your categories as you like. Have fun!

The key to making this system work is to stay diligent. Use it every day and update things as you need to.

Every time I do a workshop on creating a home management binder I get asked “Do you take it to the store when you go shopping?” NO WAY! For one thing it has personal family information in it – if I were to lose it that could be very bad. Also, Its big! So – I do have a mini shopping binder I take which I will save for another post in the near future!

Here is a few little ideas that you might find helpful.

  • Use free printable. They are available for anything topic you can think of. I will list some of my favorite links at the bottom of the web post
  • For gift certificates and small things like that use secure top plastic pockets. In my pictures these are teal colored, I found them at Staples.
  • You can also use dividers with pockets attached to hold small things you need to keep track of.
  • Keep a small pocket in the front for a pen, stamps, post it notes, etc.
  • Buy  pack of business card sleeves for those cards you need to keep track of. (I found a package at the dollar store)
  • Coupon sheets (staples)
  • If you want to save on printing for those sheets you will use up often, print off a master sheet then put it in one of those clear page protectors sheets and use a fine tip dry erase marker to write on it. Why I don’t do this – because the sheet protector stick out further that my tabs and I don’t like that. I like everything neat looking so this really bugs me (but hey, I am probably a little OCD!)
  • Under my meal planning tab I have a running list of favorite recipes. This list includes the cookbook title, page number and how many it serves. This makes meal planning easy.


A few helpful websites I like:

Into the Word Wednesday & a Give-a-way – In Gods Heart I am…

Standard

I bought this new little devotional book by Holly Gerth titled God’s Heart for You: Embracing Your True Worth as a Woman. It’s one of those quick mini 5 mins a day ones, but oh so impactful.

heart2

Each day it starts as In God’s heart I am…..

Today, In God’s heart I am…accepted.

Accepted. Am I accepted? Just how accepted am I? Accepted with all my flaws and ugliness? Or just those good things that I polish up while the rest of my junk I hide in a closet away from sight. Hidden. The truth is I am Accepted. All of me…and all of you. God accepts what we bring Him. That is the beauty of being accepted, forgiven, loved, cherished. Are you all these things in Gods Heart?

If you are His child you are. You have been redeemed. You are accepted.

Ephesians 1:6
to the praise of the glory of His grace, by which He made us accepted in the Beloved.

Psalm 71:23
My lips shall greatly rejoice when I sing to You, And my soul, which You have redeemed.

Isaiah 44:22
I have blotted out, like a thick cloud, your transgressions, And like a cloud, your sins. Return to Me, for I have redeemed you.”

Ephesians 1:7

In Him we have redemption through His blood, the forgiveness of sins, according to the riches of His grace

Today, what are you in Gods Heart?

I welcome you in the comment section below to choose a word to complete the sentence “In Gods Heart I am…”

By leaving a comment below you will enter this months drawing for a copy of Holly Gerths book  God’s Heart for You: Embracing Your True Worth as a Woman.

Blessings, Michelle.

A Blog Plan.

Standard

I am planning a change to the format of my blog. Each day of the week will have a theme to it, this helps me write and for you to know what to expect! I think it will be a wonderful arrangement.

So at this point here is my thoughts on how the week will look;

Homemaking Monday : I will write about something having to do with making your house a home. I may be sharing organizational tips, a project I am working on around my house, meal planning, sharing solutions that I used to ease my role as a homemaker, and inspiration to bless other ladies joyfully fill their role in the home

Tasteful Tuesday : Recipes! Food! and Family! Our family comes together at the family table everyday and as a mother and wife, I want to serve tasty meals on the table that also are easy to make and good for you too! I grow a lot of my own food so I will be featuring recipes that use homegrown goodness. Enjoy!

In the Word Wednesday – As a Christian, Gods Word is vitally important in my life. Wednesday I will share insights, devotions, nuggets of truth and lessons learned along the way, God moments and scripture.

Project Thursday – Thursdays I will share the fun projects I or my family is working on. Sewing, paper crafts, re-purposed items, kids crafts, whatever we are doing I hope will provide inspiration and ideas for your creative juices!

Friday – End of the week Reflections. As a mom to a growing family each week provides lots of opportunity to reflect on. Fridays I will share those times. I pray this will bless your heart as we walk through this journey called motherhood encouraging one another along the way.

Saturday School – homeschooling is not for the faint of heart! There is always so much to share that revolves around our school day.

Sunday – I don’t plan to write on Sunday. I pray that you will be sharing it with your family celebrating the hope and life we have in Christ Jesus.

I would love to welcome your thoughts in the comments section of any of my posts.

See you on Project Thursday!

Blessings,

Michelle