I have thing thing for Duct Tape. Really I do. You can make (or fix) just about anything with the stuff! This last semester at our homeschool co-op, I taugh a class about knights and we made amor, swords, axes, yes- even helmets out of duct tape. It was great. My kids like it too – so if yours are like mine and wanted duct tape for Christmas here’s a fun project for you!
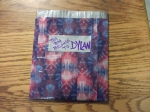
Today I made a Duct Tape velcro bag. I made this for my son Dylan, because he is always wanting to take little Lego people in the car with us. We live about 30 minutes from the nearest decent-size town so car rides can get old without something to do from time to time. This contains his little army.
You can also add handles and Wa-La a girlie purse! My daughter pointed out to me they sell Hello Kitty Duct Tape. Who Knew?
This project took me about 20 mins to make so it’s quick from start to finish. I apologize in advance, a few of my pictures will not rotate to the proper position. Sorry.
Step one gather supplies: patterned Duct Tape, silver duct tape, scissors, ruler, sharpie, sticky back velcro.
Step two: Using the pattered Duct Tape, Lay out 5 strips about 2 feet long. Attach them overlapping about 1/4 inch or so. You are creating a sheet of duct tape. Once finished using the silver duct tear off strips about 2 feet long to put on the sticky side of the patterned duct tape. Careful – this can get sticky!
Once you are done you should have a sheet of Duck Tape ‘finished’ on both sides, one with patterned tape one with silver.
Step Three: fold the rectangle in half. crease the fold line. With your ruler, draw a straight line across the top to trim off the excess tape. Cut along this line.
Step Four: You are now going to creat the side ‘seam’. Tear off a piece of patterned duct tape about a foot long and attach it to the side of your pouch. Then fold it over to attach it to the opposite side and seal you seam. Repeat on the other side. Now you should have 3 sides closed.
Step five: One the inside your going to want to reinforce the side seam. So, open up your pouch and lay the side seam flat on the table, this opens it flat. Now you going to have to put a piece of tape (should be about a foot long) along this inside seam, reaching from the bottom corner to the top edge. Repeat on the other side. I used patterned tape so you could easily see what I am taking about.
Step six: Alright, now we are going to attach a trim piece to seal the top edges. I used silver for a nice contrast to the tie-dye patterned tape. I found it was easiest to do this in two pieces rather than fumble around with one. Tear a piece of the silver tape as long as the top length of your pouch. Starting on one side, working your way around with one tape piece then the other, attach half of this tape strip on the outside then go back and fold it in. This seals the outer top edge and gives it a ‘finished’ look.
Step seven: Attaching the velcro. I used Velcro brand for this because the cheap stuff’s adhesive just doesn’t hold. May you could glue gun it but I just get all out and bought the velcro brand (really it was only a dollar more and you get a ton) Cut your velcro – both sides – to fit inside your pouch.
Pull of the strip that protects the adhesive side and stick it to the inside of the pouch along the top and press down hard. Keep the 2 velcro pieces together and pull off the other protective strip. Again, press hard to attach the velcro strip to the inside of the pouch.
You are now done! I told you it was easy! I added a “This bag belongs to:” piece from the silver tape just because I know my guy will like that, but you can decorate it any way you want – or nothing at all.
Have fun with these, kids love to make them. And if anyone see my little Pony Duct Tape message me where! My four-year old insists they must make it and is hot to trot to get her hands on some.


